The vast majority of 3D games use a perspective projection
to display their graphics. Just as in the real world, this projection
simulates the application of perspective to objects rendered within the
game, so that objects that are farther away appear smaller than objects
that are closer.
In addition to this obvious
size effect, the more subtle effects of perspective are picked up
intuitively by the brain and add a substantial feeling of depth to the
rendered scene. The sides of a cube will very slightly narrow due to the
effects of perspective as they increase in distance from the viewer,
allowing the brain to automatically determine the exact position in
which the cube is situated.
1. The Viewing Frustum
When we use a perspective projection in XNA, we create as part of the Effect object initialization a three-dimensional volume known as a viewing frustum. The shape of the frustum is that of a rectangular cone with its tip cut off. A demonstration of such a frustum is shown in Figure 1.
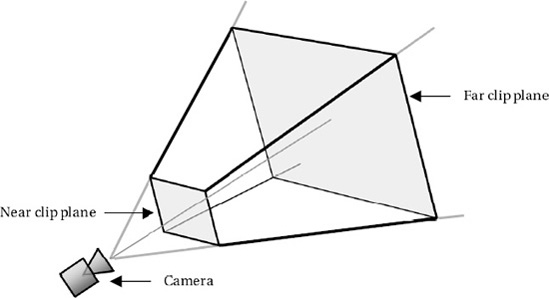
The frustum can be
visualized in the real world by imagining yourself looking through a
window. Outside the window you can see the ground and various objects.
The farther away into the distance you look, the wider the area that you
can see. Objects that are too far to the side, above, or below will be
hidden by the window frame.
Objects that fall inside the
volume described by the frustum are visible to the camera (and would be
visible through the window). Objects that fall outside the frustum
volumes are hidden from the camera (and would not be able to be seen
through the window).
The near and far clip
planes are also taken into account when deciding whether objects are
visible. Objects nearer to the camera than the near clip plane are
deemed to be too close and are excluded from rendering. Similarly,
objects farther than the far clip plane are too far away to be seen and
are once again excluded.
NOTE
When we specify an
object's z position (its distance into the screen), the negative z axis
represents movement away from the player and into the screen: as an
object's z coordinate decreases, so it moves farther away. When we
specify the distance of the near and far clip planes, however, they are
specified purely as distances from the camera and are therefore positive
values.
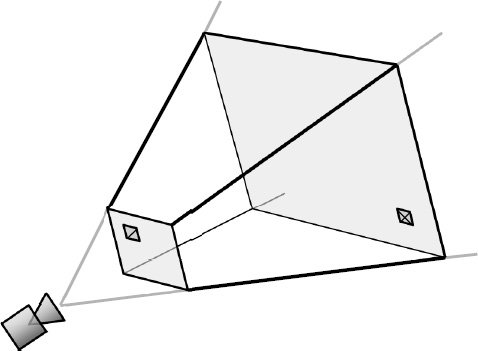
When XNA transforms the
objects that fall inside the frustum from the 3D space in which we have
defined our world into the 2D space that is actually presented on the
screen, it takes into account how much of the width and height of the
frustum is filled by any particular object. An object will occupy a
greater proportion of the frustum when it is positioned toward the near
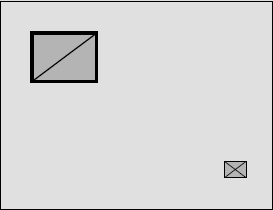
clip plane than it will at the far clip plane (see Figures 2 and 3). Figure 2 shows two identically sized objects within the viewing frustum. Figure 3
shows the same scene after the perspective projection has taken place
to transform the scene into two dimensions for display on the screen.
Note that the object at the near clip plane appears substantially larger
than the one at the far clip plane.
In addition to the clip
planes, the frustum is defined by two more pieces of information: the
viewing angle and the aspect ratio.
The viewing angle
defines the angle, in degrees, between the camera and the upper edge of
the frustum (the angle on the y axis). Changing this angle will make
the overall shape of the frustum expand or compress, causing the
apparent reduction in size of objects farther away to be increased or
decreased.
Figure 4
shows two viewing frustums from the side: the first with a viewing
angle of 45 degrees; the second with 22.5 degrees. The distance of the
near and far clip planes is the same in both cases.
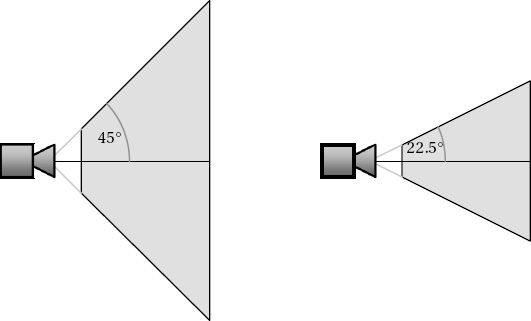
Consider how objects that
fall into these two frustums will be projected. On the left, objects can
deviate further from the center of the frustum and still be seen by the
camera. Objects that are farther away will become rapidly smaller as
their size relative to the extent of the frustum becomes less and less.
On the right, objects farther from the center will leave the frustum
more quickly and so will disappear off the edge of the screen. Distant
objects will appear larger than with the first frustum as they occupy a
greater proportion of the frustum's area.
Exactly what you should
specify for the viewing angle will potentially vary from one game to the
next. An angle of 45 degrees is usually a safe value. Setting the angle
too low can make it appear that everything is closer to the player than
it really is, which can result in the game feeling uncomfortable to
play.
|
Some interesting effects can
be achieved by varying the viewing angle at strategic times within the
game. For example, you could provide a transition between two scenes by
rapidly decreasing the viewing angle down to zero, switching the scene,
and then increasing the angle back to its original value. This process
will cause everything in the center of the screen to appear to zoom
toward the player and then zoom back again after the scene change.
"Slow-motion" effects can often be accentuated by slightly reducing the
viewing angle while they are active.
|
|
The second piece of information that the viewing frustum requires is the aspect ratio,
which is calculated by dividing the display width by its height. The
aspect ratio allows the viewing angle on the x axis to be calculated by
XNA in response to the explicit angle that we provided for the y axis.
The aspect ratio, together with the viewing angle and the distance of
the clip planes, provides everything that is needed to fully describe
the frustum.
2. Defining the Viewing Frustum in XNA
XNA actually performs the perspective transformation with the use of another matrix. Listing 1 is present to set up the default projection matrix.
Example 1. Creating the viewing frustum matrix
// Calculate the screen aspect ratio
float aspectRatio =
        (float)GraphicsDevice.Viewport.Width / GraphicsDevice.Viewport.Height;
// Create a projection matrix
Matrix projection = Matrix.CreatePerspectiveFieldOfView(MathHelper.ToRadians(45),
                                                        aspectRatio, 0.1f, 1000.0f);
|
You should be able to spot all
the information that we have discussed as being required for the viewing
frustum. The work of generating the projection matrix is performed by
the static Matrix.CreatePerspectiveFieldOfView function. The parameters that it expects to be passed are as follows, in the following order:
fieldOfView: the viewing angle for the projection
aspectRatio: the aspect ratio of the display width/height
nearPlaneDistance: the near clipping plane distance
farPlaneDistance: the far clipping plane distance
In Listing 1, a viewing angle of 45 degrees is specified, along with the aspect ratio calculated from the game's ViewPort, and near and far clipping planes of 0.1 and 1000, respectively.
When rendering, XNA
first calculates the positions of all the object vertices in 3D space
and then uses the projection matrix to transform them into 2D
coordinates to display on the screen.
If you want to change the
viewing angle (or any of the other properties of the frustum), you can
simply set a new projection matrix into the effect's Projection property before rendering your objects.
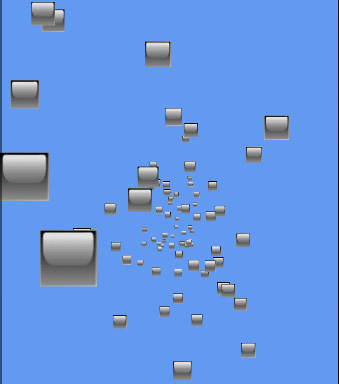
The Perspective
example project in this article's accompanying download shows how
objects move when a perspective projection is applied. The code is very
simple; it creates a number of objects with random x, y, and z
coordinates. Each time the objects update, they add to their PositionZ
value, moving them closer to the screen. When they get to a value of 0,
they add 100 to move them back into the distance. A screenshot from the
demo can be seen in Figure 5.